Friday, December 9, 2011

Hello Kitty Version 2 Personalized Glass Ornament

This is another version that came about while creating the first one. Everyone who knows Hello Kitty knows the shape and my daughter recognized this one so it passed the Hello Kitty recognition test. I didn't tell her what it was. She said awww hello kitty can I touch it. It was dry so I let her touch it..otherwise when I put my tree up I have a feeling they will be pulled off the tree..hehe :0 ).

This glass ball is personalized as well with a snowflake next to the name. Another idea for Hello Kitty manufacturer to use. Maybe you will see more of these next year. Sparkles and glitter boys and girls. Always sparkles for the little ladies....

Hello Kitty Version 1 Personalized Glass Ornament

I took some time to figure out how to make these ornaments of Hello Kitty for the little girls in our family. My daughter loves Hello Kitty and found that the ornaments in the store were not what I was looking for...so of course I had to design my own.

The ones in the store I found to be plastic shrink wrapped and not to my liking. This one has sparkles and glitter...just like our little girls want them to be. I hope they are excited to get their own personalized Hello Kitty ornaments not seen or sold in stores. Ah well, it's an idea for Hello Kitty manufacturer to make them now ...I put the idea out there. Will not be sold to general public as it is copyrighted material.

Time for Teacher Gifts!!

I may have mentioned this before but I really like snowmen. I have a couple but I cant help myself they are so fun to paint. So, this year I decided not to give out angels with the teachers name but a more abstract snowman or snowman scene with the teachers name on the back. Happy Holidays was a spare I thought I would show the writing on the back but not the names of the actual teachers.

I hope they enjoy them. They are very sparkly and will look great on anyone's tree.

Monday, December 5, 2011

Snowman with snowflake ornament

Hand painted on cork these lovely snowmen would brighten anyone's day. Hang it on the tree or hang it on the door handle. 

Tuesday, October 18, 2011

Pirate Shirt Errrgghhh..!

The pumpkin pirate was a big hit for my daughter. She loved it...but my son said he wanted a real pirate. So I did some searching online and found this cool pirate. Taking longer than the pumpkin with all the colours and making those jeans just right. I am using a bit of sparkle fun foam for the sword. Not sure how that will go over with my son. If he doesn't like it I have a bit of grey felt to do the job. The Process is the same as the pumpkin. I flip the shirt inside out...draw it. If you can't draw you can transfer a design on then cut the pieces out. Start sewing the bottom pieces first so the eyes and buttons of the eyes are last. I pinned these pieces.

Monday, October 17, 2011

Pirate Pumpkin Costume

This is a new outfit I made for the kids today. I said I was going to make a pirate t-shirt as they already have a ghost and a bat.  Recycled old white t-shirt. The hat was made from recycled dress pants, the felt I had on hand already but is store bought...the main part of this craft is recycled. I began with two pieces of felt then sewed them as shown in the photo. Then I drew on the t-shirt inside out how big I wanted the hat over the pumpkin. I trimmed the access orange inside the hat before I closed the top of the hat to make the scull bones on top stayed white. I will finish it with white around the brim of the hat. Maybe a bit of sparkle afterwards..not sure yet. I did reverse applique on the teeth and scull areas. It's kinda cool. Never tried it before so I had fun doing it. The eyes are white felt with a blue button for the dark of the eyes.


From the time it took me to find everything I needed, design it on the shirt then sew it...took me just over 4 hours this morning...which makes it the afternoon now...phew time flies when you are sewing I tell yah! Forgot to eat lunch..haha. Happy crafting folks!

Pattern: I normally draw on the inside of the shirt to get the dimension correct then place fabric over the areas and cut to size. I don't use patterns for these kinds of projects but now I have it created so I will make a template for another.

Friday, October 14, 2011

Waldorf Inspired Ballerina

I took 2 hours this morning to work on this Waldorf Inspired Ballerina. I will be making a tutorial of this soon. I first have to make sure it looks good before I show you how to do it.

This is my template for my ballerina. This is my first try at making this Waldorf inspired ballerina. I still have to figure out how to complete the shoes on her and fix the upper body better. Also, I have to make sure her arms are long enough. Her legs are the right length I think.


Wednesday, October 12, 2011

Marketing Survey

I am debating my method of how people can buy my crafts in the future. A lot of people ask me if I am selling online. I would like to know what you think about purchasing method/s you would use. Feel free to check off the method of purchase you would most likely use.

Feel free to leave comments as well below.

Tuesday, October 11, 2011

Shipwreck Wall Mural

I painted this mural one year for my oldest sister's birthday I think about 8 years ago. I designed this wall mural in high school...many moons ago but thought it would look great on her garage door. So, my youngest sister helped me transfer the painting to the garage door and we painted it the next day. Just a couple a days ago I received an email with the photo of the shipwreck renewed to its original glory. I also painted a lovely wall mural for my father one year for father's day. I don't have a photo here but if I can find it I will post it at a later date.


I have no formal training in the arts but it's fun trying all the different mediums.

Thursday, October 6, 2011

Snowman with boots

This is a template I will refine and make the face different in a later version. Thought I would share my templates as I go along to show my design process. I was making all the other designs at the same time while one dries I sometimes get an idea...so I dart off to create that one while still fresh in my head... phew busy 3 hours.

This ornament can be personalized or the year put on the bottom.

White Line Work

White lines on a ball can be designed to enchant the heart. This design will be cherished throughout the generations. Uniquely hand painted so no two are exactly alike.

I will be trying my hand at painting lace on glass balls later in November. This is my first try at painting lines with a number 10 liner brush. It's not as easy as one might think. A steady hand requires practice...so off I go to master this art.

Snowflake Glitters

I took some time today to design a couple of ornaments.  This is an abstract snowflake I created that was inspired by the dots on the ball itself. Would be considered a blemish or dark spot. So I decided to go along with the dots creating this ornament.


Making the design  big on the balls make the glitter more prominent and sparkles more. A flat white will not do on this medium size glass ball. Unique and one of a kind. Each ball is hand painted with care and precision.

Friday, September 30, 2011

Free Bonus Video Tutorial! Halloween Buddies

Just in time for Halloween. These best buddies can dish out the candies for you. Free tutorial on how to create this recycled can is located on my tutorials page. Video instructions with a material list is included in the video...so check it out. You can save two old cans on their way to the recycle bin! 

He's green and he's peaking over the edge of the counter-top. This is a large size can that was filled with tomatoes at one time. Instead of throwing these out I recycled them into something new and will last a very long time handing out candies to all the little kiddies that come for trick or treats. Full details are listed on my Tutorial page. These are instructions that you can adjust to your liking. This tutorial is to give you ideas you can recycle old cans. You can make other characters out of cans ....just use your imagination. Don't forget to post the ones you make. I would love to see how you make your Frankenstein come to life..maaaawwwhhhhhh.(evil laugh :0) )

Friday, September 23, 2011

Mummy Candy Holder Part 1 ~It's here... Free Tutorial

As promised I have completed the tutorial of the Mummy Candy Holder. I have uploaded part one of two today and will upload the last installment on Monday.  To watch this tutorial go to my tutorials link to see not only this tutorial but where I will be posting all tutorial I make.

You can always visit my Undesigning Crafter's Channel as well  .

Tuesday, September 20, 2011

Snowman Delight

Snowman with a top hat and a snowflake makes just the right combination to inspire the holiday spirit. For the snowman lover in all of us this ornament will be a great addition to any collection.
When creating this ornament, which is the template, I used it to test a new tool for punching  rivets through the cork...that wasn't a good idea as you can see. It went through but I thought the back end would wrap around the cork. Anyhoo...it ended in a big hole here. My mind is not all here today. Normally I am much more careful with templates...ah well. Can't be perfect everyday. Craft on and be happy!! : 0)

*Tip of the day....never use good material and finished painted work for testing new equipment! 
.

Tuesday, September 13, 2011

BRR Snowflake Ornament

I just completed 16 of these snowflakes ornaments. Wishing for cold to come these can be hung on a tree or just about anywhere you want. Snowman are my favorite thing to paint and decorate around the house before the month of December. I only get a chance to look at these when the season is upon us.  So taking advantage I start placing them around the house early.

Who could resist seeing these cuties hanging about.

Tuesday, September 6, 2011

Tutorial Announcement - Mummy Candy Holder

Recycled can, white old undershirt and left over felt. This project is a delight to make and I will show you how. This is the next free project I will put online for everyone to enjoy.

I really like Halloween and this can is soooo cute on my table I wanted to share it with you.


DURATION: Approximately: 2 hrs
SKILL LEVEL: Beginner// No previous experience required
SIZE: Depends on the size of can you select for this project

MATERIAL LIST:
                     Recycled can - any size will do.
                     White undershirt that has a bit of stretch to it. If it's a bit stretchy it gives it that bandage effect.
                     Felt - Salmon color - For the face
                               White - For the eyes (two black beads for the eyes or if you have something else in mind for the black.  Whatever you have handy...buttons etc. It's your mummy. I am showing you how to make the base.)
                     Acrylic paint - red (for the cheeks)
                     Stippling brush/Stencil brush (a sponge will do as well)
                     Hot glue gun 
                     Scissors /Cutting tool
                     Pen/Pencil 
                     Thread/Needle

Posting Date: September 23, 2011
Posting Type: Video format

Wednesday, August 17, 2011

Tutorial ^ It's coming your way soon!

I have a couple of projects on the go right now as you see my postings uploaded fairly quickly today. It took me a long time to complete all these as I always make more than one and not less than 10 at a time. I have 16 other cork ornaments waiting to be finished painted as I type to you today. I will create a new tutorial by the end of September. I will probably make it a video tutorial. I haven't decided if I am going to do both a video or a PDF yet. I am in the process of making new ornaments for my family gifts.

*Tip for crafting for new comers. ~~ When starting a template always make more than one at a time to get the feeling for the craft and to save time while painting one takes foooreever to complete if you wait for the one project to fully complete. I always make a bunch and paint the project one layer on all then do the next layer. By the time I get to the last one piece you painted the first one is dry in most cases.

*Tip Paint brushes ~~ The first coat you paint on your project is the most important. If you use old brushes to begin a project or at any time during the painting process it will be bumpy, inaccurate and more difficult to paint the next layer. Always use good brushes and make sure your paint is not to liquid and not too thick. It may be difficult to do as a beginner but practices does make perfect....which I know everyone says at one point or another in books and magazines and such.

Sneak Peak ===> Beer Cork ~ Wine Cork

Sneak peak...I have been working on a few things these last two weeks. These templates will change by adding something or changing the face but the idea is there. I just have to finalize the way these will look. I like the cork because it is not heavy and will look nice on the tree. The shape of the cork is perfect for this project but you can use any wooden cork. Children can make these but I would make the hats up-front as I used a hot glue gun to complete the project.

Snowman Ornament

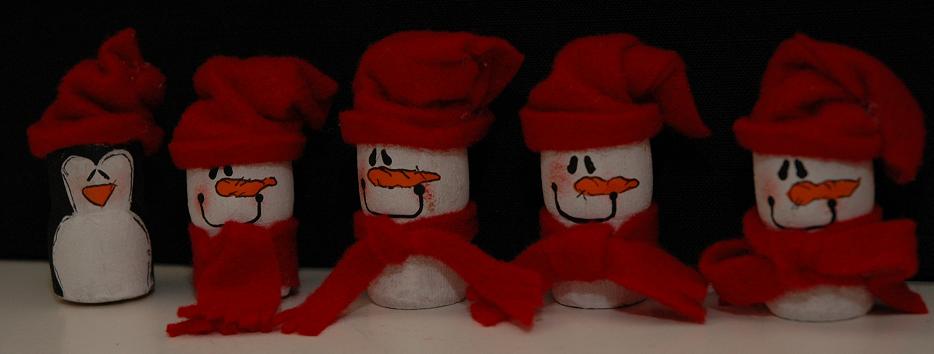
This snowman ornament can be personalized or a year put on the brim of the hat. Lightweight made of cork this is a great addition for all those snowman lovers. I made three templates. The other two have sparkles added to the ornament but it is difficult to get a sparkle photo. I made one with just the snowman that sparkles and the other is random all over the ornament. They all look cute. I will post more photos of all three so you can see for yourself.


I have been away from crafting for a couple months while my children are on summer vacation. Finding time to craft has been difficult but school will be starting soon so the crafting will begin full swing again in September.

Click to view larger. All rights reserved 2011

Friday, May 20, 2011

Terracotta with a touch of Copper

I bought some terracotta colored clay and made these lovely butterflies.


Material Used: Recycled copper from renovation, DAS clay - terracotta

Marble Magic

I wanted to make one of these since December of last year so I ended up making two. One as a teacher gift and another for a relative with a birthday coming up. The one that you never know what to buy.

Working with metal and glass to create this key chain bringing all the elements together. I have been researching on how to make some wire wrapped jewelery.  Learning the techniques for personal projects so I come up with this with a help of a book called "Wire Style". It has great ideas and project to practice. I posted a picture with the "Apple Delicious" design if you are interested in finding the right one.

Material Used: Recycled copper from renovations, marble
Measurement: 9 cm 

"Apple Delicious" Key chain

For those hard to buy for teachers that got it all. This unique key chain will surely be a hit. Given as a class gift or just to show your appreciation. Perhaps a birthday gift for a teacher you know.... I have just the thing for you. "Apple Delicious" hand forged metal with hand molded apple makes this a truly one of a kind gift.

I really liked the look of this pendant but thought it would also make a great key chain. I added on of my polymer clay apples to the design instead of the beads shown in the book. I made the design bigger so it fits snug in the hand while the apple floats about.


Material used: Polymer clay, copper, stainless steel.
Measurement: 9 cm

Wednesday, May 4, 2011

Wool Fairy Tutorial (Waldorf Inspired)

DURATION: Approximately: 2 hrs
SKILL LEVEL: Beginner// No previous experience required
SIZE: 9” / 23cm tall without hanger 


I have uploaded the PDF file. I finished the file earlier today so I thought you might want to get a head start on getting your supplies for a weekend project.


I am not an expert with wool or needle felting. This is truly a basic lesson with many steps explained. Read through the directions and hopefully I can make time to create the video for this tutorial as well next week. I like to have the option to print something out when following a tutorial. So I am creating the two types of tutorials. 


PDF FILE: Wool Fairy Tutorial 
Video Tutorial: Wool Fairy Video Tutorial

* Download the the original file.  File >> Download Original file

I would greatly appreciated if you give feedback on my tutorials to make sure the quality of the document is good and easy to follow.  Also, I would really like to see the creations you make. Please post a link so I can see what you can make. Happy Felting!!

I am posting these videos also on my YouTube channel I created.

Posting date begins: May 6th - May 14th. The videos are between 8 mins to 12 min each.
  
Click on Tutorials for further details. I have created a Tutorial page which will list all of the tutorials I will create. 

Psst... Here is a sneak peak at the tutorial coming...

"Winter Bliss" Wool Fairy Tutorial (Waldorf Inspired)

Here is a sneak peak at what is coming next week. I have almost completed the PDF file for this in-depth tutorial on how to create this lovely fairy.

UPDATE: I completed the file earlier than expected and have posted the PDF.

PDF FILE: Wool Fairy Tutorial

* Download the the original file.  File >> Download Original file

Sunday, April 24, 2011

Balance and Symmetry ~~Dragonfly Bracelet

This is a personal project I worked on this weekend while the children were outside playing. After three hours of weaving and figuring out how to make the design come to life intertwining and weigh just right on the arm. Balance and symmetry. This bracelet will be a pleasure to wear as it was to create it.

I first created the dragonfly then designed the bracelet around it.


Material Used: Stainless steel for base of dragonfly and wrist. craft wire for the very small thin wire. Beads are recycled from another piece of jewelery that broke.

Butterfly Pik Gifts

Wrapped in a cone with butterflies exploding from within. This lovely gift is tied up with ribbon and will be given as a small token from the heart.

Four butterflies will be adopted and hopefully planted with love. In return giving the room a special glow of harmony in the greenery in the house.

Plant as soon as you get me home.

Friday, April 22, 2011

UPDATE: Video Podcast - Poll is closed and results are in ...

The Podcast voting has come to a close and the one that was most popular was the Waldorf Inspired Fairy.

At 58% for Waldorf Inspired Fairy will be my first Podcast. I will be making the video and PDF next week. It will posted at undesigningcrafter's Channel. Both video and PDF take time to create. I will post both as soon as each are completed.


Thank you to all who took the time to vote. 
Nancy

Wednesday, April 20, 2011

Video Podcast Vote Update


NOTE: Don't forget to vote for the one craft you would like to see made into a tutorial. The poll will close at the end of this week.

I have been researching how to make a video Podcast. It will be a bit of a challenge as I have not ever made one. I have this poll up to see which craft in the photo is liked the best. To know which of the tutorials you would like me to create a podcast for check one or more of boxes on the right side poll I have posted. I will see which is the most popular and create a podcast for it.


Once the poll is completed I will post a date of when the podcast tutorial is available for viewing.

Friday, April 15, 2011

Clay Butterfly Picks

While designing the butterfly essential oil mobile I decided to make myself some lovely piks to go in the garden. I don't have flowers just yet in my potted plants but these surely brighten the greenery up. Some are twisted to wrap around the plant such as the tree trunk in the upper left photos shows. A variety of curves and bends making this a unique gift for those with a green thumb waiting for spring to arrive. They can be also used indoors to brighten up any plant you desire.


Butterfly Measurements: Varies. Big 3 inches, med 2 1/2 inches, Small 1 1/2 inches.
Material Used: DAS clay, galvanized wire.

Butterflies A Flutter

I came up with this idea not to use citronella candles. Kids and candles (fire) don't mix well. So, I come up with this idea. Butterfly essential oil mobile. It makes a great gift for everyone.

It is hung on a see through suction cup giving the illusion that is hangs alone. Three butterflies all different sizes. A couple of drops on the back and the sent is there for hours. It can be used with other oils as well. I just use it for decoration near my door to keep the misquotes out. Lavender is also good to use to keep the bugs at bay. When using essential oils you have to use some caution and read the directions carefully. Always wash your hands after using essential oils.


Butterfly Measurements: 3 inches, 2 1/2 inches, 1 1/2inches. 
Mobile Measurements: 7 inches measuring from the hoop that wraps around the suction cup to the tip of the lowest butterfly.Spanning just  4 1/2 inches across it is compact enough for anywindow.
Material Used: DAS clay, galvanized wire.

Tuesday, April 5, 2011

Apple For The Teacher

An Apple for the teacher gift set.Wear them together or separately. Made with Polymer Clay and wire wrapped heart floating on a string. It will surely bring a smile to the one who receives these apples.

The rope is self adjusting so one size fits all. Wear it long or short. I was thinking of ways to make this set adjustable to any size and in my research I found a site that show different types of knots. This one suited my needs. Sliding knot. Easy to learn and very functional to this piece. If I can make something myself  I prefer to have control over all aspects. The red clay and green clay I choose have sparkles mixed in the clay. Very nice touch to show off the apple. I choose the Classic Polymer clay as the red color was the most vibrant as well with the green.

I have never used Polymer clay before but used Crayola Magic. So I have some experience with molding by hand so the tutorial I followed was very informative. I also made sure I followed the baking instructions. I was not prepared for the red to transfer to my skin so next time I use Polymer clay I will wear gloves.


NOTE: I would like to thank Amy from "the b-line" with her fantastic tutorial of  let's make {apple charms}. It was very easy to follow and with lots of photos.


UPDATE: 11/04/11

I found that the glue holding the wire in place inside the apple was not strong enough. I have made the apple more secure by drilling through the apple and using wire to keep it in place. Just in case those little fingers pull hard there is no way the apple will come off the wire.


Friday, April 1, 2011

Gingerbread Angels

The last in a series of felt angels. The gingerbread angels are surely a treat....but these you can not eat. Hang them from your tree and they will bring Christmas wishes and smiles all around. Made with felt, a touch of clay and frosting to top them off.

I had in mind to put a nose on them but I did not like the way it looked and I found they are different than other gingerbread angels I have seen. Making them one of a kind.

NOTE: As with all the angels the scarf they wear and the ornament on the scarf will vary.  I also have an angel ornament and a tree ornament yet to adorn one of these lovely angels.

Monday, March 28, 2011

Copper Angel

Made with copper and hammered to take form of this lovely angel. I have to work on the bail a bit. I am not an expert wire worker. I will be making more in copper and see how they turn out.

Angel's Prayer Ornament

I made some sketches this weekend and made a couple angels. This one is made with stainless steel and beads. Wire wrapped and wire weaving have made this a unique piece of art.

Friday, March 25, 2011

Butterlfy Takes Flight

So this morning I took about 2 hours to design and create this butterfly. Made with copper and white pearl looking beads. Hammering isn't as hard as I thought it was going to be but then I wasn't too sure when the stop. I am satisfied the butterfly is hammered enough.

This is one piece of copper twisted to form the butterfly.  I will put a pin attachment on the back and then it will be finished product. It is the first one I make so keep an eye out for more designs in the coming months...this stuff is addictive and hammering is therapeutic.*wink wink*


*All copper base is recycled copper left over from renovations in progress*

Thursday, March 24, 2011

"Thank You" Teacher Gift Tag

The month of March is almost gone and June is fast approaching for year end gifts to Teachers. This tag is made with clay. Individually stamped each letter and including a new apple stamp I created. I had some black ribbon on hand and  thought it would look nice. This tag will not be sold with a ribbon . 

I have personalized these. The tags I am making now will be blank on the back. A decorative pen could be used to write the name or a small message on the back. 

Tuesday, March 15, 2011

Charming Apple

Apple for the Teacher...
Wire wrapped with red beads and bit of weaving. This is a charm for appreciation to give to a great teacher. It will not rot or smell and will last a lifetime as teachers do make lasting impressions.

Hand crafted original design. You can use it as a key chain. Dangling from a briefcase or a purse. It will surely be an eye catcher and bring back fond memories of that year. Makes a great class gift.


Update: March 24,2011


I have included a rope necklace I made by braiding and a with copper clasp. This is my first attempt at making a clasp for a necklace so the next one will be less copper and more pleasing to the eye.


 Update: March 16, 2011
I was looking at the design and decided to move the ruby colour beads inside the apple. I will post the new photo soon. In the design process changes are made to modify to make the project unique and functional as best as possible.

*All copper base is recycled copper left over from renovations in progress*

Felt Penguin Angel

Designed to make you smile. This is truly a unique gift for any penguin lover out there. Soon the set of four will be complete. An Angel, Snowman Angel, Penguin Angel and Gingerbread Angel.

Penguin Angel with a new ornament placed on the scarf. Clay snowman, star, tree and angel replace the felt shapes I bought as I can no longer find them locally.

The final angel will be completed in the next couple of days so keep your eyes open ...

Friday, March 4, 2011

Clay in motion

I have been working on some clay creations for this year. When designing the felt angel I bought some lovely little felt trees and stars to decorate the scarf but this year I could not find them. I had to come up with another solution for the design. I like to mold things so when I come across these cutters made for Christmas I knew I could use them for the scarf replacement of the felt ones.

There are a couple of sizes but I originally had these cutters in mind for one thing but as I made some bigger sizes I thought...why not some gift tags for everyone this year. I also have a the tree in three sizes along with a star.

Hand cut and stamped with Christmas motif these lovely tags would look fantastic on a gift for your loved one. Little things always make a big impact when putting the finishing touches on a gift.


Next week I will post the new Felt Penguin Angel Ornament. Don't forget to vote for your favorite craft. Everyone have a good weekend.

Thursday, February 17, 2011

Video Podcast Craft Tutorial Anyone?

I have been researching how to make a video Podcast. It will be a bit of a challenge as I have not ever made one. I have this poll up to see which craft in the photo is liked the best. To know which of the tutorials you would like me to create a podcast for check one or more of boxes on the right side poll I have posted. I will see which is the most popular and create a podcast for it.


Once the poll is completed I will post a date of when the podcast tutorial is available for viewing.

Sunday, February 13, 2011

Let It Snow ~ Let It Snow

A  hint of sparkle and real snow. Wishing for snow and bringing holiday cheer. This ornament is unique and is made of cork. Hand painted and original design to bring you closer to that special time of the year.

There are two colors to choose from purple and pink. I will post the pink at a later date.

Gingerbread Kisses

This gingerbread will melt anyone's heart. Dark chocolate brown 60mm glass ball. Hand painted and designed with a snowflake making it cute as a  button. With eyes that glow and a powdered nose. He brings gingerbread kisses and holiday wishes.
This gingerbread is small but will have a big impact on your tree. Making this a family matter I made a big 60mm and a smaller one for those who like to have a variety on their tree. Hand molded nose with a touch of powder making this a great addition to those gingerbread lovers. Measurements to follow for the small ball.

All these ornaments were given to my family this year so I am posted all the photos I took over the holidays. I didn't just create them in a week. It took me 4 weeks to create these and there are more to come. I think I painted at least 60 balls for all my family members and close relatives. I was a busy bee on vacation. :0 )

Just to let everyone know I haven't had my own Christmas tree. So, this year I will have to make a lot of ornaments to fill my own tree. I have been painting ornaments for 12 years so I look forward to having one this year. All my family have all these ornaments on their trees which looks great. It makes me happy to see them on the tree. It will be special for me to have them on my own. I don't expect to buy to many to put on my tree. This year I have to start saving some of the new ornaments I design for my tree.

Delightfully Red

Wire wrapped deep red Christmas ball. This was a gift to my mother. The first in a series of glass wrapped balls I will be creating some wire wrapped balls in silver at a later date..

Felt Snowman

This new design brings out the snowman in all of us. Plush and fluffy to the touch this ornament will be anyone's delight to hang on your tree.

The second of three felt ornaments. The penguin design will be coming at a later date. Double layered wings and all hand sewn with care. Sparkling wings and a orange nose making this felt snowman unique with each stitch.

Friday, February 11, 2011

Passionate Purple Fairy

I created this fairy with a touch of copper and beads to try something a bit different. This fairy measures 20cm long from head to copper beads on the bottom. Well formed she will grace any area of the room with her presence. This Waldorf inspired fairy will be included in my inventory of things to sell at the Kerstmarkt.

I have other colours of merino wool but have not created any new ones lately. Keep an eye out in the coming weeks as I will be posting  "Pretty in Pink" and "Winter Bliss".

Psst. They are not so hard to make once you get the technique down. The more I make the easier it gets and the less time it takes me to make them. Pipe cleaners, wool batting, merino wool and some wool hair is all that is needed.

If you are in the area I live in there is not a craft/hobby store around. The two stores I have gone to and are currently open. They have merino wool and pipe cleaners. DeBanier and Kreabo are both filled with lots of hobby tools and accessories. I really like the Kreabo because it is much bigger in supplies...a warehouse full of crafts and things.I could spend all day in there looking at everything and wanting to buy it all..haha. oh well, one craft at a time. I am closer to DeBanier but will frequent both as they have great supplies. It took me a long time to find these two places. There seems to be a demand for crafting but not too many store stay open in my area.