Friday, September 23, 2011

Mummy Candy Holder Part 1 ~It's here... Free Tutorial

As promised I have completed the tutorial of the Mummy Candy Holder. I have uploaded part one of two today and will upload the last installment on Monday.  To watch this tutorial go to my tutorials link to see not only this tutorial but where I will be posting all tutorial I make.

You can always visit my Undesigning Crafter's Channel as well  .

Tuesday, September 20, 2011

Snowman Delight

Snowman with a top hat and a snowflake makes just the right combination to inspire the holiday spirit. For the snowman lover in all of us this ornament will be a great addition to any collection.
When creating this ornament, which is the template, I used it to test a new tool for punching  rivets through the cork...that wasn't a good idea as you can see. It went through but I thought the back end would wrap around the cork. Anyhoo...it ended in a big hole here. My mind is not all here today. Normally I am much more careful with templates...ah well. Can't be perfect everyday. Craft on and be happy!! : 0)

*Tip of the day....never use good material and finished painted work for testing new equipment! 
.

Tuesday, September 13, 2011

BRR Snowflake Ornament

I just completed 16 of these snowflakes ornaments. Wishing for cold to come these can be hung on a tree or just about anywhere you want. Snowman are my favorite thing to paint and decorate around the house before the month of December. I only get a chance to look at these when the season is upon us.  So taking advantage I start placing them around the house early.

Who could resist seeing these cuties hanging about.

Tuesday, September 6, 2011

Tutorial Announcement - Mummy Candy Holder

Recycled can, white old undershirt and left over felt. This project is a delight to make and I will show you how. This is the next free project I will put online for everyone to enjoy.

I really like Halloween and this can is soooo cute on my table I wanted to share it with you.


DURATION: Approximately: 2 hrs
SKILL LEVEL: Beginner// No previous experience required
SIZE: Depends on the size of can you select for this project

MATERIAL LIST:
                     Recycled can - any size will do.
                     White undershirt that has a bit of stretch to it. If it's a bit stretchy it gives it that bandage effect.
                     Felt - Salmon color - For the face
                               White - For the eyes (two black beads for the eyes or if you have something else in mind for the black.  Whatever you have handy...buttons etc. It's your mummy. I am showing you how to make the base.)
                     Acrylic paint - red (for the cheeks)
                     Stippling brush/Stencil brush (a sponge will do as well)
                     Hot glue gun 
                     Scissors /Cutting tool
                     Pen/Pencil 
                     Thread/Needle

Posting Date: September 23, 2011
Posting Type: Video format

Wednesday, August 17, 2011

Tutorial ^ It's coming your way soon!

I have a couple of projects on the go right now as you see my postings uploaded fairly quickly today. It took me a long time to complete all these as I always make more than one and not less than 10 at a time. I have 16 other cork ornaments waiting to be finished painted as I type to you today. I will create a new tutorial by the end of September. I will probably make it a video tutorial. I haven't decided if I am going to do both a video or a PDF yet. I am in the process of making new ornaments for my family gifts.

*Tip for crafting for new comers. ~~ When starting a template always make more than one at a time to get the feeling for the craft and to save time while painting one takes foooreever to complete if you wait for the one project to fully complete. I always make a bunch and paint the project one layer on all then do the next layer. By the time I get to the last one piece you painted the first one is dry in most cases.

*Tip Paint brushes ~~ The first coat you paint on your project is the most important. If you use old brushes to begin a project or at any time during the painting process it will be bumpy, inaccurate and more difficult to paint the next layer. Always use good brushes and make sure your paint is not to liquid and not too thick. It may be difficult to do as a beginner but practices does make perfect....which I know everyone says at one point or another in books and magazines and such.
Sneak Peak ===> Beer Cork ~ Wine Cork

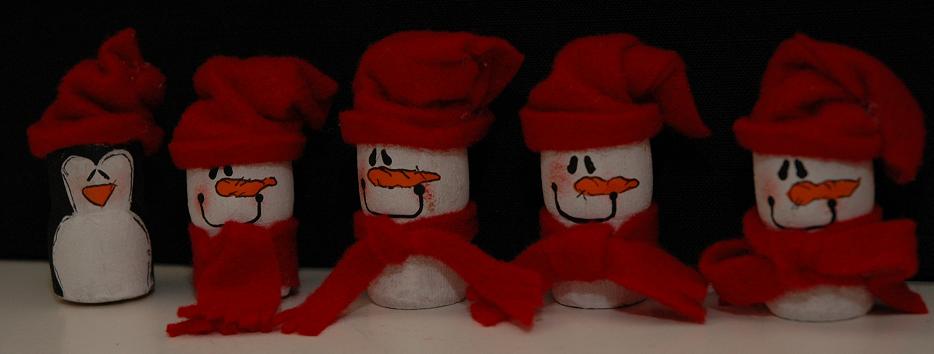
Sneak peak...I have been working on a few things these last two weeks. These templates will change by adding something or changing the face but the idea is there. I just have to finalize the way these will look. I like the cork because it is not heavy and will look nice on the tree. The shape of the cork is perfect for this project but you can use any wooden cork. Children can make these but I would make the hats up-front as I used a hot glue gun to complete the project.

Snowman Ornament

This snowman ornament can be personalized or a year put on the brim of the hat. Lightweight made of cork this is a great addition for all those snowman lovers. I made three templates. The other two have sparkles added to the ornament but it is difficult to get a sparkle photo. I made one with just the snowman that sparkles and the other is random all over the ornament. They all look cute. I will post more photos of all three so you can see for yourself.


I have been away from crafting for a couple months while my children are on summer vacation. Finding time to craft has been difficult but school will be starting soon so the crafting will begin full swing again in September.

Click to view larger. All rights reserved 2011

Friday, May 20, 2011

Terracotta with a touch of Copper

I bought some terracotta colored clay and made these lovely butterflies.


Material Used: Recycled copper from renovation, DAS clay - terracotta

Marble Magic

I wanted to make one of these since December of last year so I ended up making two. One as a teacher gift and another for a relative with a birthday coming up. The one that you never know what to buy.

Working with metal and glass to create this key chain bringing all the elements together. I have been researching on how to make some wire wrapped jewelery.  Learning the techniques for personal projects so I come up with this with a help of a book called "Wire Style". It has great ideas and project to practice. I posted a picture with the "Apple Delicious" design if you are interested in finding the right one.

Material Used: Recycled copper from renovations, marble
Measurement: 9 cm 

"Apple Delicious" Key chain

For those hard to buy for teachers that got it all. This unique key chain will surely be a hit. Given as a class gift or just to show your appreciation. Perhaps a birthday gift for a teacher you know.... I have just the thing for you. "Apple Delicious" hand forged metal with hand molded apple makes this a truly one of a kind gift.

I really liked the look of this pendant but thought it would also make a great key chain. I added on of my polymer clay apples to the design instead of the beads shown in the book. I made the design bigger so it fits snug in the hand while the apple floats about.


Material used: Polymer clay, copper, stainless steel.
Measurement: 9 cm